Catch A Rainbow In A Jar!

Rainbow Belle’s enchanted paintbrush is pretty special. Did you know that she can dip it in her magic dust handbag and wish for any colour she wants? That’s how she paints rainbows in the sky!

Sometimes she uses it in her little art gallery at Pot of Gold Place, too! In fact, just this week, she made a rainbow and caught it in a jar! Isn’t it beautiful? Would you like to make one, too? Here’s how!

Catch a Rainbow in a Jar

You need:

Cup of granulated sugar
7 plastic food bags (ziploc or self-seal)
Food colours: Red, yellow, green, blue, purple, pink
Glass jar


Why not make a double rainbow?

  • Divide your cup of granulated sugar equally between the seven plastic food bags.
  • Drop some red food colouring into the first bag, close it and knead the colour into the sugar, squishing and rubbing the bag gently until the sugar turns red.
  • Do the same to make bags of yellow, green, blue, purple and pink sugar. To make orange, mix half red and half yellow colouring.
  • When you’ve made all your coloured sugars, slowly pour the pink sugar into the bottom of your jar and gently tap the jar, so that the sugar spreads out evenly.
  • Now pour on a layer of purple sugar and tap again, followed by blue, green, yellow, orange and – the top layer - red.
  • Quick… put the lid on the jar so your magic rainbow can’t escape! (And don’t forget to show your friends what you caught!)

We hope you have fun catching a rainbow in a jar – it’s a great crafty make with some magical colour-changing and tactile sugar squishing thrown in!

Have a special and wonderful week – with love and magic dust from the Magic Belles in Bellevue xxx

Make Magic Belles Flutterbud Friends!

Happy day! We’re thinking about friends in Bellevue today! Love Belle loves her friends so much and she likes to cheer them up by playing happy tunes on her pink heart guitar – she always puts a smile on everyone’s face.

The Magic Belles are all great friends. They love jingling their special symphony together, or they like to put on their party dresses and fill up their handbags with magic dust and flutter around Bellevue, looking after their special wonders!

Cutting Out Your Flutterbud Friend

Who are your best friends? What do you like to do with them? Maybe you could play with our new Magic Belles paper dolls? We call them Flutterbud Friends!

All you have to do is print them off, ask someone to help you cut them out, and then slot them together for some fluttery lovely Magic Belles fun!


Print out and play with Butterfly Belle and friends!

You can download our paper doll Flutterbud Friends here! We hope you have great fun making them and playing with them, too!

Email us your pics and we’ll make you one of our very special Flutterbud Friends (and send you a cute colouring-in page to say thank you!).

Lots of love and magic dust from us all in Bellevue xxx

Cupcake Belle's Rainbow Cupcakes

Cupcake Belle's Rainbow Cupcakes

There may not be much sunshine in Bellevue at the moment, but we’re never lacking in rainbows! In fact, to cheer everyone up, Rainbow Belle has been painting beautiful rainbows everywhere!

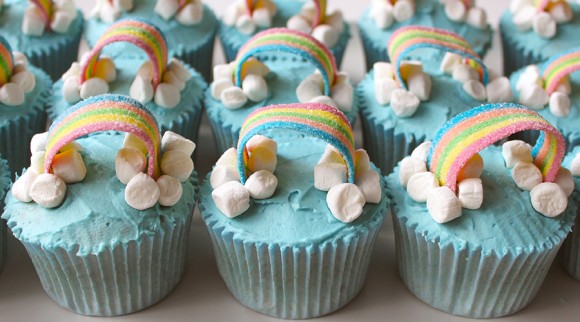
To thank her friend for making Bellevue a more colourful place, Cupcake Belle got busy in her kitchen at Cupcake Chalet and created these special treats. Aren’t they fluttery lovely? Would you like to make them, too? Here’s how…

Make Cupcake Belle’s Rainbow Cupcakes

Yummy Rainbows

Yummy Rainbows

You need:

12 vanilla cupcakes (see our recipe)
Buttercream (see our recipe)
Blue food colouring
Rainbow belt sweeties (available in sweet shops and newsagents)
Mini marshmallows

  • Colour your buttercream light blue to look like the sky (we used baby blue paste colouring) and make sure your cupcakes are completely cool. Ideally, place them in the fridge before decorating.
  • Trim off the top of each cupcake so that it’s completely flat, then smooth the buttercream generously over the top using a knife or palette knife.
  • Use a sharp knife to trim each rainbow belt into sections of 6 to 7cm long (not too long or they’ll flop in the middle). You need 12 mini belts in total.
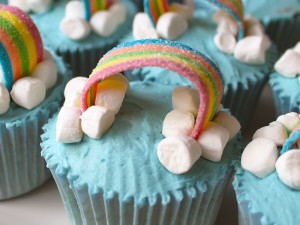
  • Place one mini rainbow belt on top of a cupcake, wedging each end into the buttercream to make a rainbow shape.
  • Hold your mini rainbow firmly in position by placing mini marshmallows all the way around each end, to look like clouds.

Cupcakes, buttercream, sweeties and marshmallows! It’s a sweet dream come true! Now all you have to do is share them with a friend and brighten up their day. We hope you have fun making Cupcake Belle‘s creation!

Love and magic dust from the Magic Belles in Bellevue xxx

Hello Busy Bumblebee!

This week’s Wednesday Wonder is big, fat, buzzy bumblebees – good friends of Bellevue’s best little dancer, Butterfly Belle! She looks after all the cute little bugs in Bellevue, including honey bees, ladybirds and butterflies, of course! But Butterfly Belle loves nothing more than dancing around the garden with her busy, stripy bumble friends.

There’s a reason that bumblebees are called ‘busy’ - it’s because they’re one of the hardest-working bugs in the garden, collecting nectar and carrying pollen from flower to flower, which helps new flowers and fruits to grow. We need bumblebees so that we can have beautiful gardens – and the more flowers you plant, the more bees you’ll see!

There are lots of different species of bumblebee, but the ones you’ll see in your garden will probably have yellow stripes and fluffy white bottoms – you can find out more about them over at the Bumblebee Conservation Trust!

In the meantime, we thought you might like to hear one of Butterfly Belle’s favourite songs! It’s great for dancing around the garden to, or the living room! We hope you enjoy it! Love and fuzzy, buzzy bumbley cuddles from the Magic Belles in Bellevue xxx

If you ever feel in need of a cuddle and hear a little guitar twanging or a gentle jingle nearby, then it’s probably Love Belle fluttering by and working her magic for you!

Love Belle‘s pink heart guitar doesn’t just look fab, she can play all kinds of wonderful tunes on it - famous songs that you probably know, happy pop songs and lovely lullabies that’s she made up all by herself.

Can you play a musical instrument? If not, why not get started with a pink heart guitar, just like Love Belle’s? Here’s how to make your own…

Love Belle's Pink Heart Guitar

Make Love Belle’s Pink Heart Guitar

You need

2 x A4 pink card
Pencil
Milk carton lid
Scissors
Small cereal box (selection pack size)
Three elastic bands
Cardboard tube
Double-sided sticky tape
Sequins – pink and stars
Glitter glue

  • Cut an A4 sheet of pink card in half, fold it in half (with the longest edge folded) and draw half a heart on it.
  • Place half a milk carton lid in the middle of the heart, on the fold, and draw around it. With the card still folded, cut around the half circle and then cut out the heart shape.
  • Unfold the heart and you’ll see a hole in the middle of a perfect heart. In the other half of the A4 card, cut out an oval shape that’s the same width as the heart.
  • Place the heart on the small cereal box so that the hole is in the centre. Draw around the inside of the circle on the box.
  • Cut out the circle in the box to make a hole and stick the pink oval below it. Then stick the heart onto the box, so that the holes line up and the pointed tip of the heart is over the oval.
  • Cut 2cm deep slits all the way round one end of your cardboard tube and fold them back. Trim them a little (if you need to) and stick them to the side of the cereal box to make the guitar neck. It should be coming out of the top of the heart.
  • Use double-sided sticky tape to stick pink paper around the guitar neck.
  • Finish off the front of the guitar with a few pink sequins, lots of silver star sequins and a line of glitter glue – or use loads of glitter glue! (You can never have enough glitter glue and sequins!)

Now all you have to do is twang your guitar and sing along with Love Belle! Why not visit our Magic Music page and twang along to that? You could also make Love Belle’s fab Paper Plate Tambourine to jingle along with!

We hope you have lots of fun with your pink heart guitar! Lots of love from the Magic Belles in Bellevue. xxx

Star Belle

Awww, isn’t this adorable? Ava, who’s 6 and from Hartlepool, has sent us a really lovely magic star picture for Star Belle to put on the door of her home, Twinkle Towers!

Ava was following our Wednesday Wonder make from earlier this week. What a wonderful idea, Ava! We just love it!

We think it’s such a fab idea, we’re going to go away and make one for each of the Magic Belles (and our own doors, too!).

Thank you so much - we’re sending some very special magic dust in your direction. Lots of love from the Magic Belles in Bellevue! xxx

Sirius - the brightest star!

Thank you EricMagnuson for the lovely photo.

Did you know that there’s one star in the night sky that’s bigger and brighter than all the others? Can you spot it in the picture here? It’s called Sirius and you can see it sparkling early in the evening, just after the sun sets. Star Belle uses a lot of her magic dust to light this star!

Sirius means ‘glowing’ and, though it looks like one star, there are actually two stars there – Big Sirius A and its little friend Sirius B!

Sirius has a great nickname - the Dog Star – because it’s part of a bigger constellation (remember? We heard about those before!) called Canis Major or the Great Dog. In different parts of the world, Sirius is called the Wolf Star, Dog-Face and Moon Dog!

Would you like to make a magic star painting? It’s so easy - here’s how!

Starry Dusk

Make a Magic Star Painting

You need:

A4 white paper or card
White or yellow wax crayons (white works best)
Black or blue paint, watered down
Fat paintbrush

  • First, use your wax crayon to draw lots of lovely big stars on the white paper and colour them in. They’re almost invisible, aren’t they?
  • Now dip your paintbrush into the watery paint and paint over the paper. Can you see what happens? The stars start to twinkle, like magic!

Smiley Starry Night!

You just lit up the stars, just like Star Belle! Why not do another magic star picture and give your stars smiley, happy faces, like this one we did?

We hope you have lots of fun doing this! Love and magic dust from the Magic Belles! xxx

Rainbow Belle's Eggs

Hello to all our fluttery lovely friends and welcome to this week’s Wednesday Wonder! We hope you’re all having a fab Easter break and getting up to lots of fun things!

Rainbow Belle wanted to share with you her new hobby – this week, she’s painting eggs to give as presents to her friends!

She’s going to paint a special wonder on each egg – so Butterfly Belle will get an egg with butterflies on it, Flower Belle will get an egg with flowers on it, Cupcake Belle will get an egg with cupcakes in it… you get the idea!

A Rainbow of Eggs!


Why don’t you try it too? What’s your best friend’s favourite special wonder, colour or pattern? Why don’t you paint it on an egg? Here’s how to do it:

  • Hard boil some eggs and let them cool completely.
  • Squeeze your favourite acrylic paint colours onto a palette.
  • Add a tiny bit of water so that it paints smoothly over the eggs.
  • Paint all over an egg in one colour and let it dry.
  • Now paint on your design – spots, stripes or your friend’s favourite special wonder!
  • If you need some ideas, check out our Special Wonders Spotter’s Guide!

We hope you have lots of messy fun painting eggs and don’t drop one (like we did!!). Have a great chocolatey Easter everyone! Lots of love from the Magic Belles in Bellevue! xxx

Cupcake Belle's Secret Recipe Butterfly Cakes

We’ve had so many requests for Cupcake Belle’s Secret Recipe Butterfly Cakes since we launched our new story, that she has decided to share it with you! Not just because you’re all fluttery lovely, but because Cupcake Belle loves to make the world a sweeter and yummier place – and butterfly cakes are a pretty good place to start. We hope you have fun making them – and look out for the secret ingredient below! When you’ve finished, Cupcake Belle would love to see your butterfly cakes - send us a photo and we’ll post it in our Flutterbud Club!

Here’s how to make your own Secret Recipe Butterfly Cakes.

For the cakes:

  • 125g unsalted butter, softened
  • 125g caster sugar
  • 2 medium eggs, lightly beaten
  • 1 tsp vanilla extract
  • Secret Ingredient: 2 tsps golden syrup
  • 125g self-raising flour
  • 2 tbsp milk

For the buttercream:

  • 100g unsalted butter, softened
  • 200g icing sugar, sifted
  • 1 tsp vanilla extract
  • 1 tbsp milk or water

For the decoration:

  • Your favourite sweeties or sprinkles

Here’s how you do it:

  1. Preheat the oven to gas mark 5/190ºC/375ºF and line a 12-hole muffin tin with cupcake cases.
  2. Beat the butter and sugar until they look light and creamy, then stir in the beaten eggs, vanilla extract and golden syrup.
  3. Fold in the flour and stir it into the mixture, then add the milk and mix it in well.
  4. Spoon the mixture into 12 cupcake cases and bake in the oven for 12-15 minutes until the cakes are a light, golden brown. Let them cool on a wire rack.
  5. While they’re cooling, make the buttercream – whisk the softened butter and icing sugar together until they’re soft and fluffy. Add the vanilla extract and milk or water and whisk again.
  6. Now ask an adult helper to cut a circle off the top of each cake.
  7. Slice each circle in half to make two butterfly wings and put them to one side.
  8. Spoon buttercream into the hole in the top of each cake and pop the butterfly wings into the buttercream. Leave a gap between each wing.
  9. To finish, decorate the body with sweeties and sprinkles to make your Butterfly Cakes as pretty as possible! You could even decorate the wings with writing icing.

Yum yum! Let’s hope Butterfly Belle‘s butterflies don’t land on them and eat up the delicious topping! xxx

Sweet Lovebirds

This week’s Wednesday Wonder is dedicated to Love Belle‘s special little friends: lovebirds. Aren’t they adorable? Have you seen them on Love Belle‘s page? See what happens when you click on them!

Lovebirds are small parrots, which live mainly in Africa. They’re called lovebirds because they stay with their partners for a very long time and love to cuddle up to each other! You can keep them as pets, but they like to have lots of toys to play with – especially mirrors - and you need to keep them company or they get bored. Love birds are cute, but they’re brainy, too!

Love Belle thought you might like to play with her fun lovebird toy – you can spin it round and make her lovebirds kiss!

It’s called a thaumatrope (which means ‘wonder turner’ in Ancient Greek). In Victorian times, children used to play with them a lot! Just spin it around and you’ll see the magic start to happen, as the two pictures on either side become one. Here’s how you do it…

Love Belle's Wonder Spinners

Make Love Belle’s Lovebird Wonder Spinners!

You need

Paper
Scissors
Glue
Blu-Tack or towel
Needle
Cotton
Chopstick or pencil

  • Print out Love Belle’s Wonder Spinners pdf and cut out the two circles.
  • Glue the circles together to make a disc – the birds should be the right way up and the hearts should be upside down.
  • Put the disc on top of a ball of Blu-Tack or a folded up towel and use a big needle to prick holes through each of the four dots.
  • Thread cotton through one hole, loop it through the hole next to it and pull it through. Make sure both sides of the cotton are the same length and tie a knot in the end.
  • Use another piece of cotton to do the same on the other side.
  • Spin the disc around and around so that the cotton gets tightly twisted on both sides, then pull the cotton on both sides to make the disc spin. Can you see the love hearts coming out of the kissing birdies? Isn’t it sweet?
  • For an even easier version of this toy, cut out the heart shapes and glue them together at the top of a chopstick or pencil. Spin the stick or pencil back and forwards in your hand and you’ll see two birds sitting together!

We hope you enjoy playing with this fab little toy - and making the lovebirds kiss! Have a fab week from the Magic Belles in Bellevue! xxx